
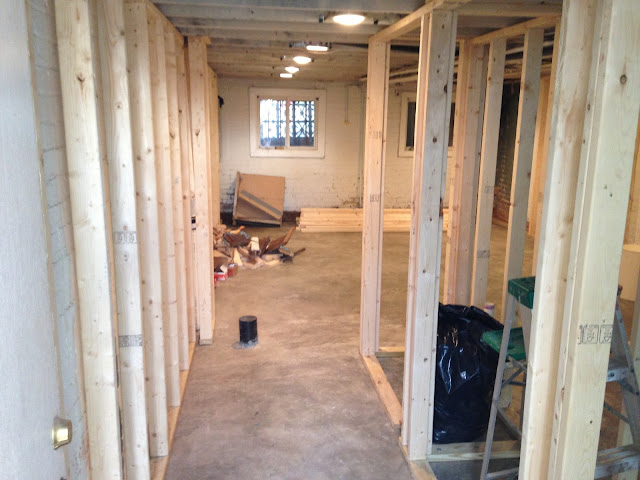
The Framing Begins
The day after the floor was poured the framing began and in a little over three hours George and his guys has nearly finished off the framing. All the have left is the front wall with the windows and the staircase.
We Have a New Floor and it's Level
First thing Thursday morning George arrived with his crew and a concrete truck ready to pour the new floor. After the plumbing ground work passed inspection George leveled the dirt floor (filling in around the new pipes and sump pump.


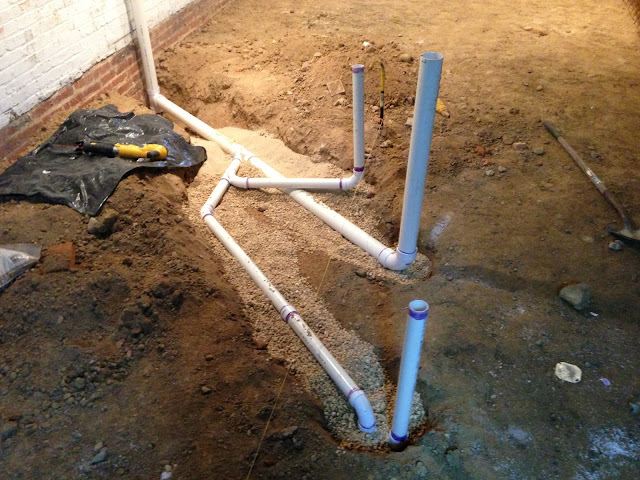
Revised Plumbing and a Sump Pump
The plumbing ground work inspection was on Monday (and we passed), but the weekend before George made a few updates to the plumbing. The setup looks a lot better now and more straightforward. Here is the new layout before George added the back water valve. The shower is the closest followed by the toilet and sink.

Buttons, Piping, and Refinishing: Faux Eames Reupholstered
We picked up the new fabric along with the button kits at Joann's Fabric and got to work on the buttons and piping. The button project proved a bit difficult because the supplied backs in the kit were too flimsy. We used some buttons we had lying around that happened to be the right size. The kit had a fabric template so we cut it to shape, applied some fabric glue, and jammed the button in the back. I wish it was as easy as that, my wife spent quite a bit of time finessing these buttons into shape and her hard work paid off. While all of my attempts failed miserably.


Digging Done, Drainage Done, Inspection Waiting
The dig out was completed yesterday. They cut a line in the floor parallel to the back door and remove the remaining concrete and dirt.. There will be a small step up to the utility room.


We Gained a Foot
To our surprise when we came home last night, George had nearly finished the dig out and instead of removing six inches of concrete and dirt he took out a foot. That's right, we went from having a finished 6'10" clearance to 7'4". The guys did an amazing job.


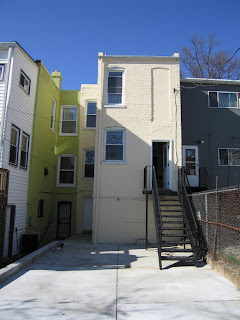
Evolution of the Yard
When we bought the house four years ago the backyard wasn't ideal for our needs. A big concrete slab without a fence. So we've slowly made improvements to make it a more livable space. Here's the back yard right after the purchase.

What Do You Mean We Need a New Floor?
Day two began with George and his concrete guy looking more carefully at our slab. There was a fairly lively discussion in Spanish that didn't make George seem too happy. The original plan was to use a liquid leveler and to leave the existing slab as is, but that wasn't going to work here. The existing slab was too weak to support the tile for the bathroom, it was barely two inches thick. They need to remove the entire floor and pour a new one.
Now we immediately assume there is going to be a huge cost to this just considering the amount of additional labor. They need to break up the entire floor and dig down about 6 inches (or more) so they can pour a new four inch thick floor. In the end the additional cost was reasonable and included new stairs. We had been planning on just putting on new treads and risers. The best part though is the digging down a half foot. My clearance was always a bit tight at 6'8" (actually its the minimum for code) and getting two more inches will feel like a lot.
As you can see the floor was very thin and there were already a few patched cracks that showed a little movement. The floor came up pretty easily. They got most of it done with the small jack hammer before the full size one arrived.
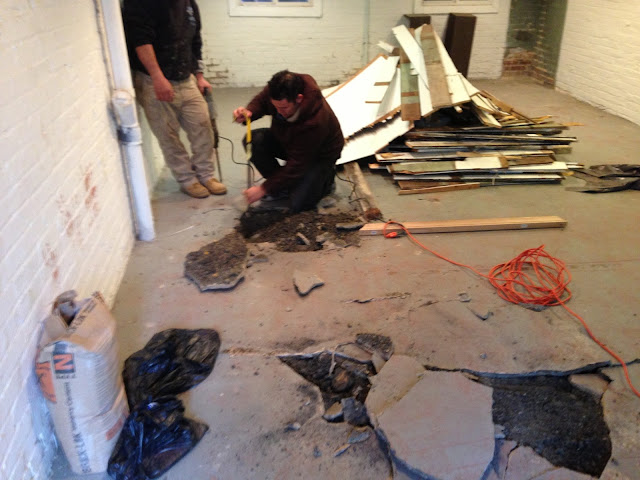

The Real Demo Begins
My contractor, George Soto (Soto Construction), came over by himself early Friday morning to knock out the remaining demo. He just needed to remove the wall and some framing under the stairs. Day one went well and was for the most part uneventful. I wish I could say the same for day two.
Before:

Before:

The Deconstruction: Faux Eames Reupholstered
We picked up two of these faux Eames lounge chairs off of craigslist a few years back and we've finally re-upholstered one of them. Here you can see how faded the fabric was and the ripped arm rest. The cushion was also non-existent. So we took the whole thing apart and refinished the wood, added new foam, buttons and fabric.

Dressing Up a Campaign Dresser
We picked up this campaign dresser awhile back off of craigslist for my wife to use as her new vanity in our guest room/dressing room. The dresser was it pretty good shape it just need a a little sanding and wood putty on the banged up corners. There was also one missing brass bracket, so we picked one up on ebay (it was harder to find than I had expected). We cleaned off the hardware and gave it a fresh coat with brass colored paint. I think the brass hardware looks great, especially against the new white finish.
BEFORE:

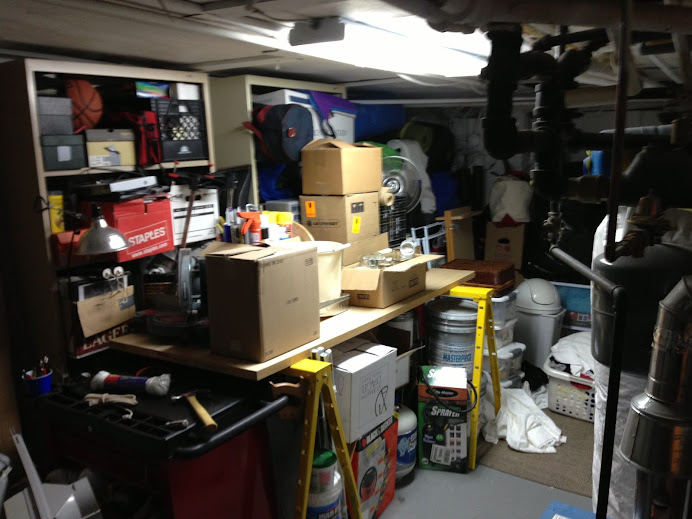
Organization, Light Demo and the Find
Now that the renovation is days away we needed to get organized. We started by moving everything we could into the utility/boiler room. As you can see, we crammed in quite a bit of stuff into the small 13' by 10' room.
Then we started on the light demo. Removing as much as I could without moving the existing electrical. This wall is coming down to make room for the future shower and the closet will be transformed into a proper closet re-framed out and adding a light and a door.
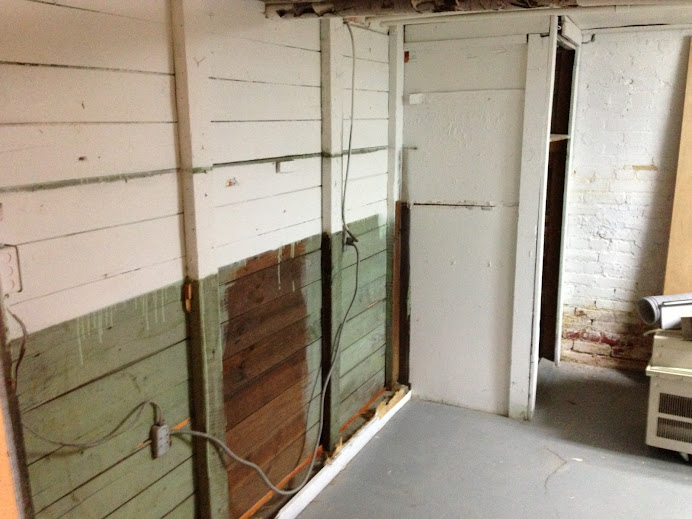
Then we started on the light demo. Removing as much as I could without moving the existing electrical. This wall is coming down to make room for the future shower and the closet will be transformed into a proper closet re-framed out and adding a light and a door.
Subscribe to:
Posts (Atom)